
The plot of your story is essentially the skeleton that you will need to fill in with words. The plot outlines everything major in your story, such as the beginning, the middle, the climax, the end, and the resolution. Creating an interesting and powerful narrative requires that you understand how to plot your story properly, as well as how to refine the plot and focus on the point of it. So, for today’s post, I’ll be teaching you how to create a compelling story by creating an amazing plot for your next book.
Understanding the Basics of Plot
Before we really get into how to actually create the plot for your story, let’s talk a bit about what the plot even is. I’ve already mentioned that the plot is basically the skeleton of your story that you will fill in with the actual story itself, but the plot is essentially the sequence of your story’s events.
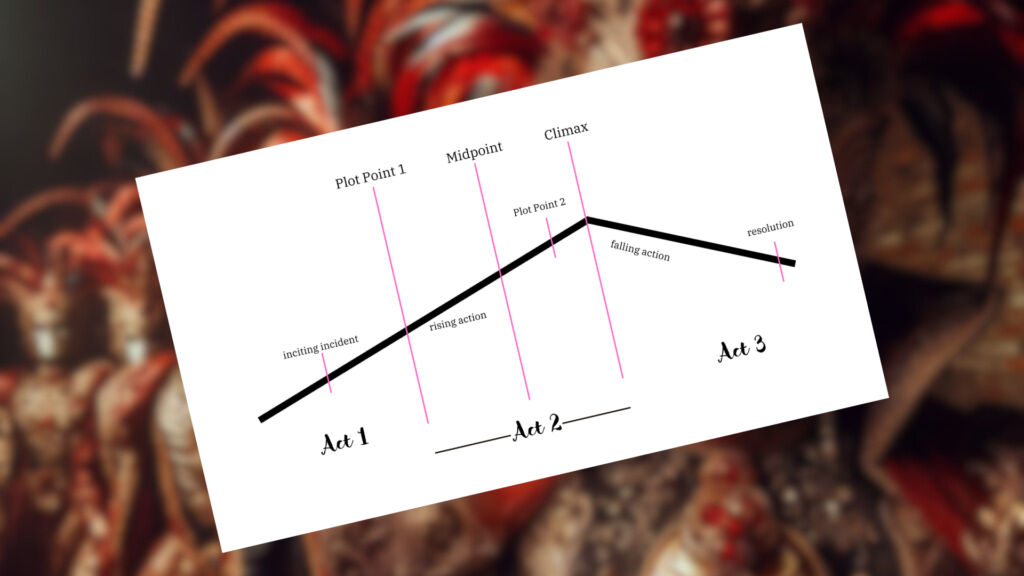
The plot includes the framework of your characters, themes, conflicts, settings, and more exist within and populate. There are many different plot structures out there that you can learn about, but the one that I’m sure most of us know from our English class by now is the three-act structure:. This structure includes the setup, the confrontation, and the resolution. More specifically, these acts can be broken down like this:
- Exposition
- Rising Action
- Climax
- Falling Action
- Resolution
The exposition and occurs within Act 1. The exposition is basically where you as the writer will introduce the setting, the characters, and the primary foundations for your conflict, which then spills into the rising action.
The rising action marks the end of Act 1 and fills up Act 2. In the rising action, you develop the conflict more and build up the story. This all leads up to the climax of the story.
Get your copy of Book 1 of my series, The Fallen Age Saga, today!
The climax of the story is the big event that pretty much changes everything for your character and is the start of the second act of the story. This is the turning moment that affects how the story will pan out for the rest of the plot.
The third act includes the final pieces, meaning the falling action and the resolution. In this phase of the plot, you are basically tying up the main conflict and resolving it. In this phase, a lot of the story really seems to ramp up in anticipation of the way the conflict will eventually be resolved. It’s also a period of the story that will change the character’s life from the beginning, and this clear character growth should be identifiable.
The resolution is basically when everything is wrapped up and the story is ready to end.
Step 1: Come up With Your Story Idea
Before you even begin plotting your story, you need to come up with a story idea. The idea is basically the foundation of your plot and allows for you to build a structure around it. For example, if I’m writing a romantasy story, I’ll reference my list of 50+ romantasy writing prompts and choose one of the prompts:
- Two students at a magical boarding school are fierce rivals, but unordinary circumstances link them together
The story idea is really where you develop everything around it. You need to consider things like the central theme, the main characters, the motivations present in the story, the main conflict of the story, the setting and the time period, etc…
Once you’ve got an idea that you can use to build up a concept to write about, you’re ready to move on to the next step.
Step 2: Develop the Main Characters
The characters are pretty much the heart of the story and the plot will revolve around them. A good main character or good main characters is a really vital piece of the story. If you have a bad set of main characters, then your readers won’t feel as encouraged to read the story and they may even abandon it.
You can develop interesting characters through character profiles, which include things like the name, the background, the personality traits, the strengths and weaknesses, goals and desires, etc…
You’ll also need to create character arcs, which is basically the transformation and/or growth that your character is supposed to undergo throughout the story.
Step 3: Time to Structure Your Plot
Using the three-act structure, I’ll show you how to plot out your story and create a logical flow of ideas that you can turn into a story.
Keep in mind that just because you’ve outlined your story, it doesn’t mean that your final product will be the same thing as you started with. However, as you work through the story, having a plot structure to refer back to is helpful for new ideas and staying on-track.
The Three-Act Structure
- Act One: Setup
- Exposition: Introduce your main characters, your chosen setting, and initial conflict.
- Inciting Incident: This is when you create an event that will disrupt the character’s status quo and propel them towards the main conflict.
- Plot Point One: The first plot point is a significant event that will solidify the character’s involvement in the main conflict.
- Act Two: Confrontation
- Rising Action: The rising action is where you develop the main conflict and introduce a few subplots to propel the main conflict forward.
- Midpoint: The midpoint is a major event that will begin to push the main character’s story in a different direction.
- Plot Point Two: A major turning point for the character that helps to push the story into the climax.
- Act Three: Resolution
- Climax: The most intense part of the story where the main conflict reaches its peak. This is the biggest turning point of the entire story. Everything is going to change after this point.
- Falling Action: Begin to resolve the conflict and tie up any loose ends.
- Resolution: Close off everything that’s left and end the story.
Step 4: Outlining Your Plot
Now that we have our three-act structure, we want to actually fill it in and begin outlining the plot as we want our story to shape up. This is also your story’s roadmap and helps you as it acts as a reference for your overall story.
After you’ve filled out your structure, you can then go in and come up with ideas to fill in the blanks in between. A story is often 50,000-110,000 words on average, depending on what genre you’re writing in. But for the most part, you can plan out each individual chapter.
Doing this is really easy in Scrivener, which I’ve made a whole guide about before if you’re interested. For the most part, you want to create a sort of “card” where you fill information out about what the major points of your chapters are. You can also mark the cards that fit on your three-act plot structure and then fill around those.
Step 5: Conflict and Tension
Your plot will need conflict and it will need tension, as this is a very important part of the story. When you create your plot’s structure, you should think of the biggest conflict points and try to understand what is going on, the context of that particular plot point, and why it impacts the story.
There are different types of conflicts you can include in your story, including external conflicts, internal conflicts, or something similar. To learn more about the different conflicts in literature, you should check out this post.
Step 6: Write Good, Realistic Dialogue
Enhancing your story requires having great dialogue as well, as dialogue is often what helps to propel the plot forward and give your characters the feeling of being more realistic to your characters.
Dialogue is something that takes time to master, but the best practices in dialogue writing are to make it feel natural and I recommend doing this by analyzing real conversations that aren’t scripted between people. For instance, people don’t call each other by name constantly in a conversation, but they use things like “um” “like” “maybe” or such words to fill in their speech.
For more tips on how to write natural dialogue, check out this post.
Step 7: Get Feedback from Beta Readers
If you’ve already started writing your first draft and want some feedback from others, you can try and employ the help of beta readers. Beta readers are basically people who are often from your target market that have an interest in your style of story and are willing to read your draft and give you genuine, honest feedback.
Finding beta readers isn’t too difficult, but you’ll have to search around a bit to find people willing to read your story. I’ve written about beta readers before, so you should check out that post for more information.
Step 8: Refine Your Draft
After getting feedback and editing your draft, you’ll want to keep refining it and referring back to your original plot for ideas and to remind yourself of the important points of your story. You want to make sure that you’re staying on task and aren’t veering too far off and creating tons of plot points, as you may confuse readers at some point.
Refining your draft is an important part of the writing process and you’ll want to get feedback after making major changes in your story as well.
Creating a plot and then a compelling story go hand-in-hand. The outlining and structuring of your plot is basically the first phase of the writing process before you fill everything in, but it’s an important part because you need to have some sort of plan. I personally used to not plan much before writing, but I found that planning was a helpful part of the writing process, even if my story changed over time.
Before you head on out, check out my series, The Fallen Age Saga and don’t forget to sign up for my newsletter to stay up to date on my WIPs, posts, updates and more.